The AR-15, or Armalite Rifle 15, is America’s most iconic AR-15 iron sights weapon. Originally developed in the 1950s to serve the U.S. military, the rifle was later adapted to become the M16, which is still in use by the armed forces today. The M16 was further developed into the M4A1 carbine. It all stems back to the AR-15.
More than 5 million Americans own an AR-15, many of them choosing to build their own customized model.
Building an AR-15 rifle is a great pursuit for any arms enthusiast. The process isn’t easy and you’ll have to climb some fairly steep learning curves along the way. By the time you’ve completed your rifle, you’ll have an intricate knowledge of how it works and a deep connection with it.
Building your own AR-15 is a fun and rewarding process that we strongly recommend. In the end, your rifle won’t be just some stock model off the factory line, it’ll be your rifle, built with custom parts to meet your specific preferences. For the advanced shooter, this is essential.
If you are just starting to get into shooting you might want to check out these guides first.
Decide on the Main Use for Your AR-15 Rifle; Are you a hunter or a competitive shooter? Do you want an AR-15 for entertainment and hobby, or is this primarily a weapon for home defense? The first thing to consider when building your own AR-15 is why you want a rifle in the first place.
An AR pistol is an AR-style rifle with a barrel under 16 inches in length and no buttstock. It’s better suited for home defense and can be shot in most indoor ranges, as well as 9mm shooting competitions. A PCC is not ideal for hunting and long-range shooting.
Once you’ve decided on the type of AR-15 you want, the next step is to choose the right caliber. Each caliber has its own pros and cons. The standard caliber for an AR-15 is 5.56 NATO, although there are various alternatives.
An all-around great caliber to shoot in many people swear by the .204 Ruger after they use it for the first time.
The .224 Valkyrie is another affordable caliber to shoot in that is better suited to hunting small game and long-range shooting.
Built to replace sub-machine guns with an M4, this cartridge will shoot supersonic and subsonic ammo with zero issues.
With insane stopping power, the .458 SOCOM is ideal for close-quarters hunting and a perfect fit for short barrel rifles.
This is a caliber that was initially intended to stop vehicles and car bombs, so you know that it’s going to pack a serious punch.
This was essentially designed as a round meant to mimic the 7.62x39mm rounds of the AK-47. It offers insane performance at long-range but is very expensive to shoot.
This round was developed for the M4 to shoot at long-range targets. The military declined to use it because most engagements take place at closer ranges.
One of the big advantages of building your own AR-15 is that you can generally do it for less than the price of a factory model. That being said, you should budget enough money to build the best AR-15 you possibly can, otherwise what’s the point?
Choosing the best parts for your AR-15 isn’t going to be a quick process. You’ll need to do a lot of research on each component of the rifle and talk to other shooters who have built their own rifles. Forums are great for this, and there are loads of online resources available comparing parts.
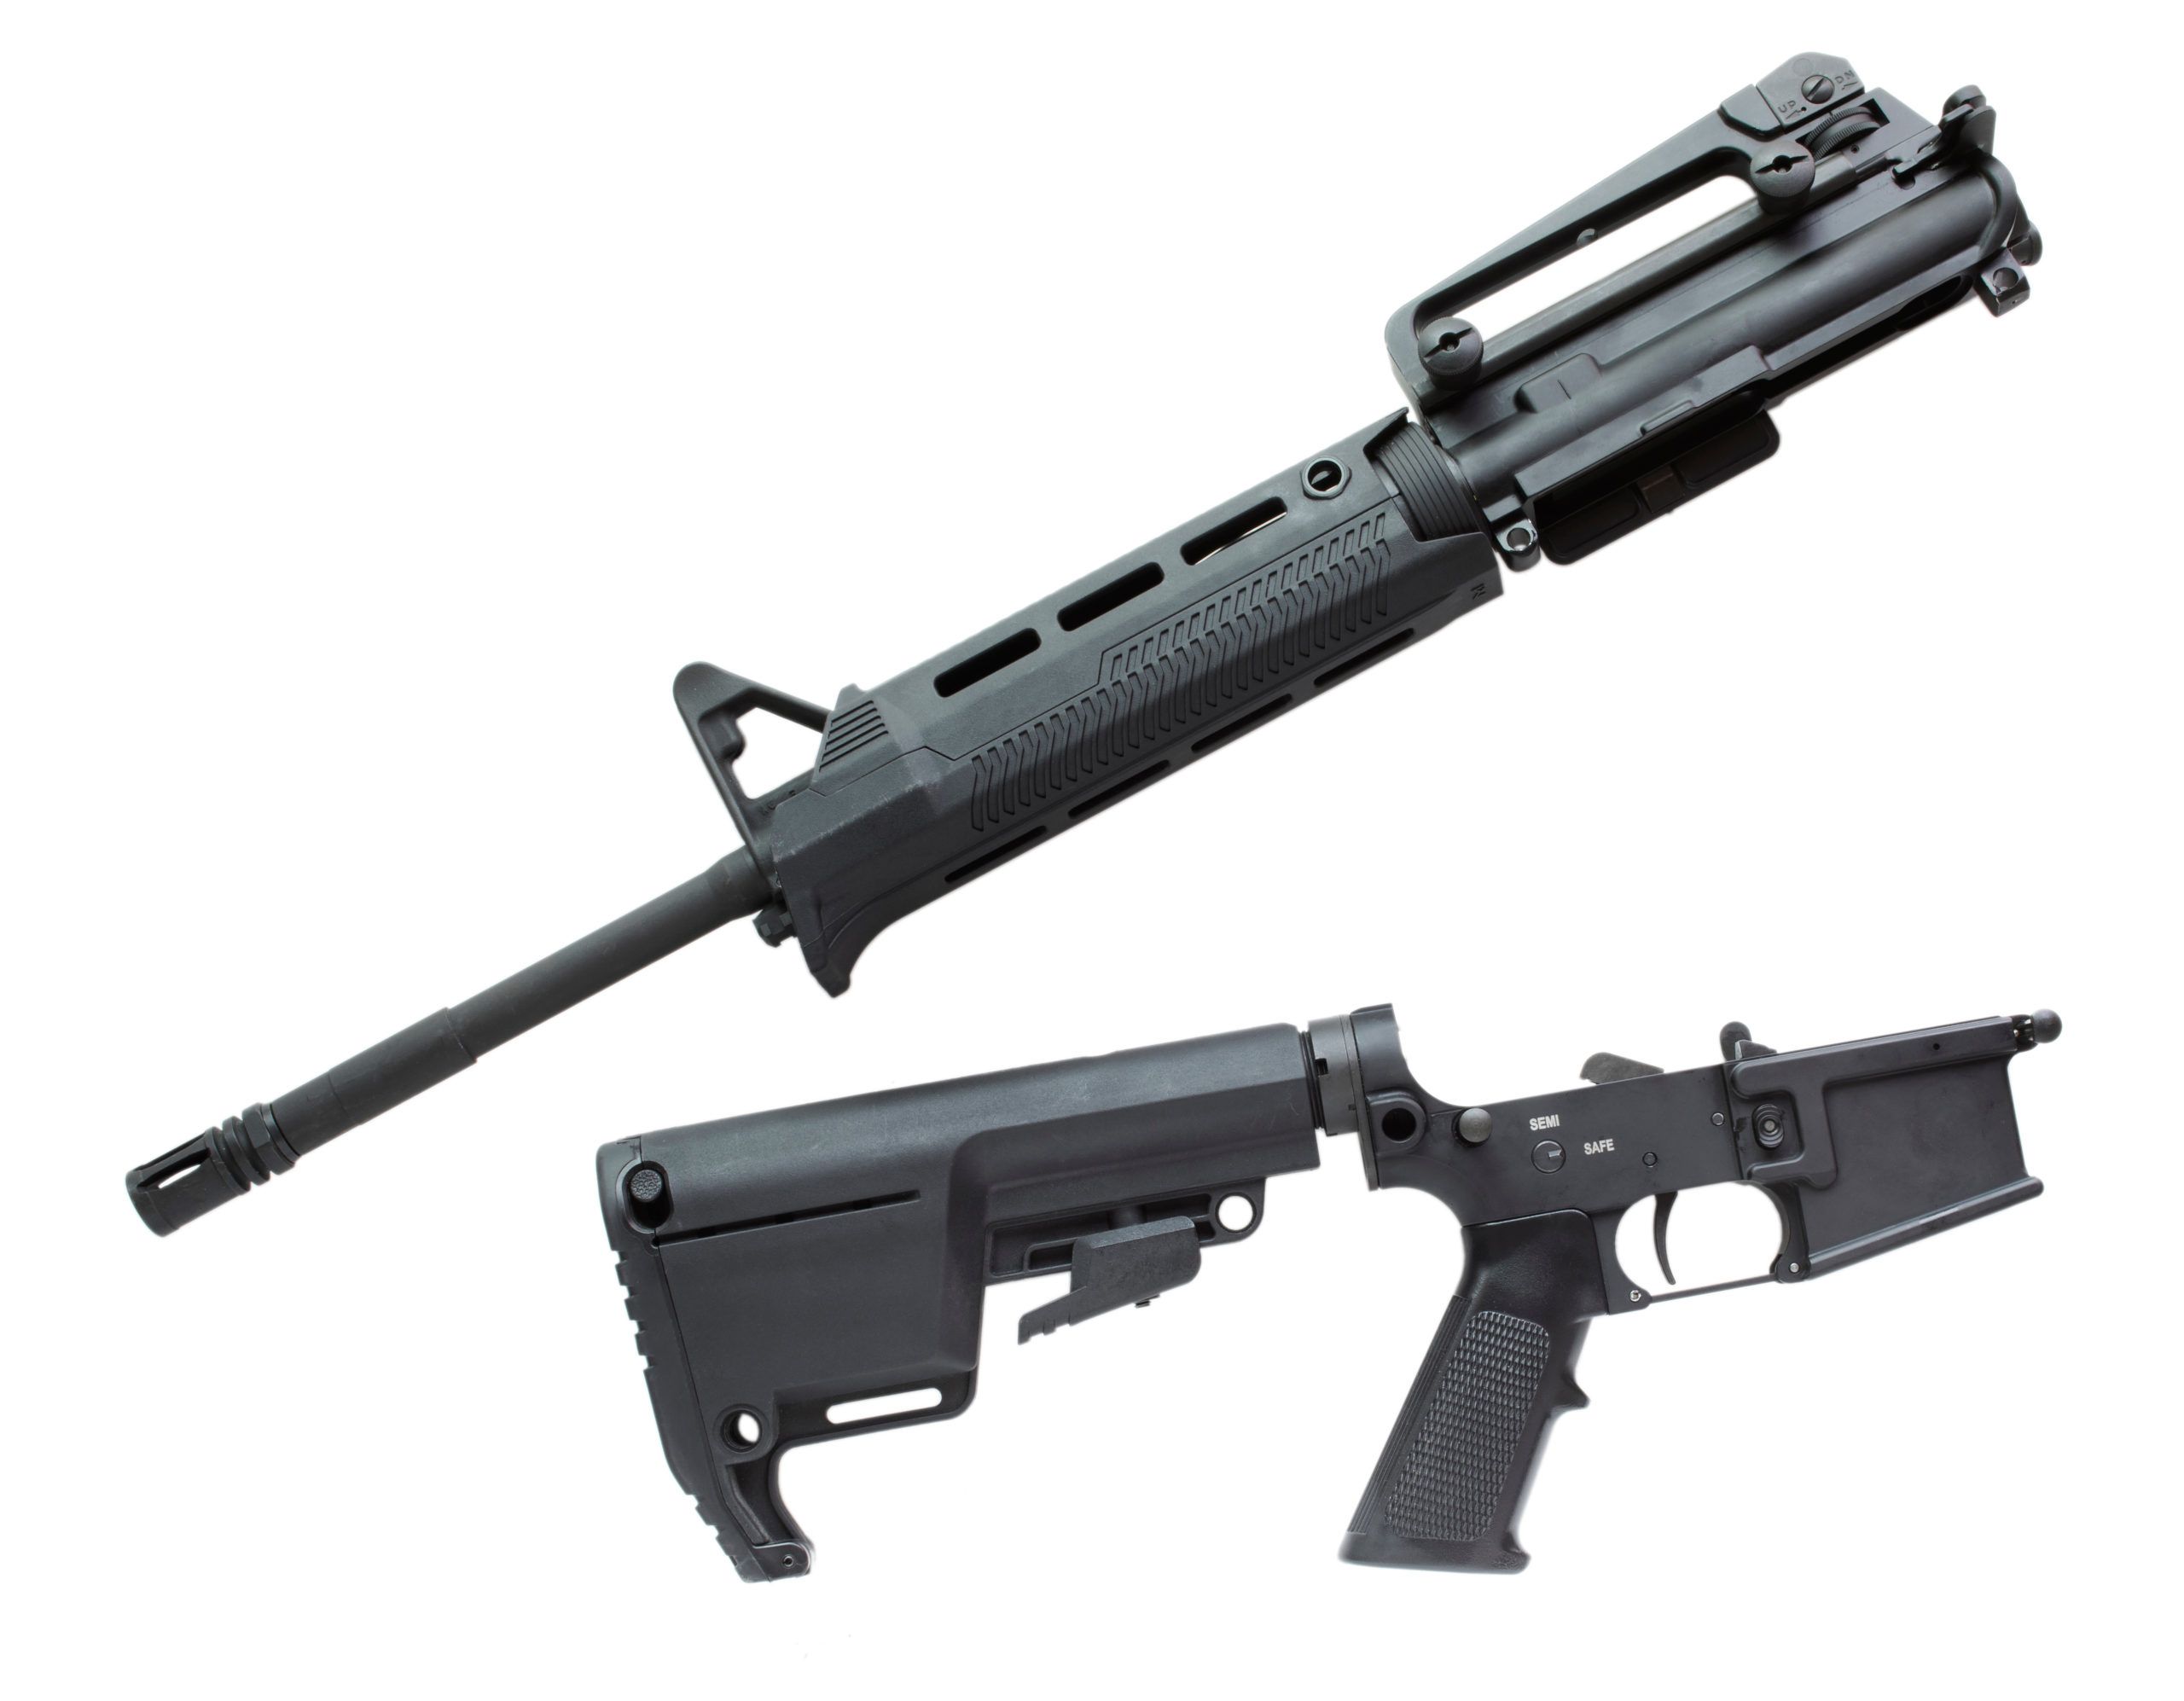
An AR-15 consists of two main parts, the upper receiver, and the lower receiver. You can buy both in various stages of construction, from complete to 80% finished, meaning you’ll need to do some of the millings and drilling yourself, Stripped uppers and lowers let you pick all the components yourself.
The barrel is the most important part of your AR-15. It determines which caliber you’re shooting in, as well as how far you can shoot and how accurate your shots will be. There are a few things to consider when choosing a barrel.
Your barrel length will determine the velocity of your rounds. Shorter barrels are better for maneuverability and large muzzle devices, while longer barrels offer more velocity, and therefore more long-range accuracy when fired. In general, 16-inches is the Goldilocks length.
When it comes to choosing a rifle barrel, your best bet is to go for the more affordable 4140 Chromoly, the more accurate 416R Stainless Steel, or the most popular choice, 4150 Chromoly Vanadium (CMV). These materials come closest to meeting or surpassing mil-spec requirements.
Rifling means twisted ridges cut into the bore that forces the bullet to spin as it’s fired, stabilizing its flight for accuracy. There are several methods of adding rifling to a barrel to consider when building your AR-15.
Getting a chrome-lined bore may reduce accuracy a little but greatly improves barrel life and performance when rapid firing. You can also choose melonite for better accuracy.
AR-15 twist rates are between 1:7 to 1:12. This refers to how many times the rifling does a complete rotation in one inch. For standard 5.56 or .223 Remington rounds, you want to stick with 1:7 or 1:8, probably the latter for practical civilian rounds.
READ MORE: The Complete Guide to AR-15 Barrels
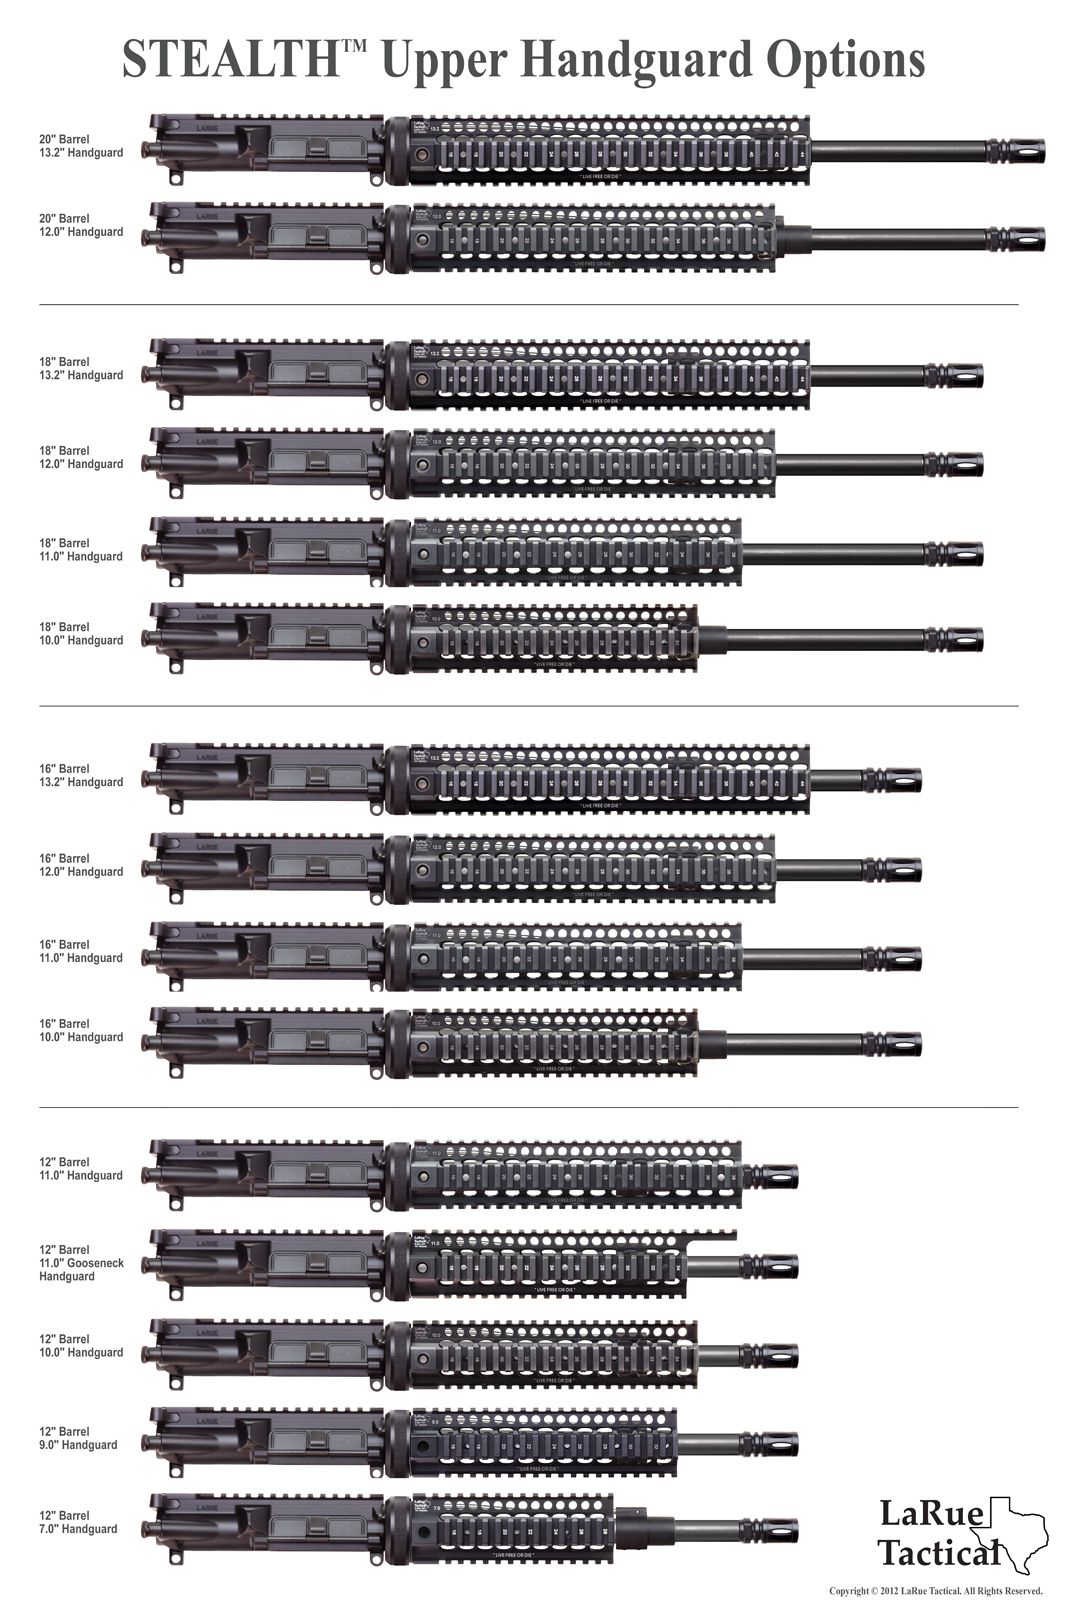
Different uppers give your AR-15 a unique look and feel, although they generally all accept any barrel, gas system, and BCG unless you’re chambering your AR-15 in a special caliber like 9mm or .300 BLK. There are a few styles to consider, each with varying practical benefits.
The A1 to A4 uppers refer to the designs of the upper receiver from the original A1 upper from the 1950s AR-15 to the modern A4 upper that is found on most AR-15s now sold out of the factory.
The main thing to know is that A2 uppers have a carry handle, which limits the type of scopes and optics you can mount, while the A4 upper comes with a flat top rail that supports a variety of mounts.
Here are some of the best quick detach AR-15 scope mounts, and 1-4x scopes that are great for the AR-15 platform.
The M4 flattop upper is essentially the same as the A4 upper. It has a Picatinny rail that supports pretty much every optic and accessory on the market. This makes it the most popular choice for most factory and custom AR-15s.
Complete upper assemblies are pre-assembled and include the barrel, gas system, handguard, and so on. They’re drop-in systems that are much easier to install, making them ideal for novices who just want to get on with the shooting.
Stripped uppers come with just the upper receiver itself, so you can customize the upper assembly any way you like using individual parts of your choosing.
Ultimate Guide to The Best AR-15 Upper Receivers
The bolt carrier group is responsible for firing, ejecting, and loading rounds. BCGs are designated into semi-automatic and fully-automatic designs. Fully-automatic bolt carriers do not make your AR-15 fully auto. However, full-auto BCGs are generally more reliable than semi-auto BCGs. You have various materials and finishes to choose from, a good choice is chrome-lined Carpenter steel.
Most charging handles do the job the same way. The most you can really expect is for one to have a bigger grip than the other, or to be better suited to lefties.
Dust covers for the ejection port are also pretty much standard, although you might want to get something printed on yours to give your AR-15 that extra touch of spice. It is possible to go without a dust cover entirely if you prefer.
There are various styles of handguards that change the aesthetic of your AR-15 and allow for different mounting systems. The most important thing is that the length isn’t too short for your gas system.
Check which barrel and gas system length the handguard is designed for before buying it. Free float handguards can be longer than the gas block, while drop-in ones will need to be the exact length to attach onto your gas block. Free float handguards are more accurate, more expensive, harder-to-install, and have better accessory mounting options than drop-ins.
The gas system on your AR-15 uses hot gas from each shot fired to force the BCG back, eject the spent cartridge, and chamber a new round. This is what makes an AR-15 a semi-auto weapon. There are two main gas systems to choose from.
Both of these systems do exactly the same thing, but the direct impingement method forces the dirty gas back into the receiver, whereas the piston gas system ejects the gas outward so it doesn’t eventually foul up the firing mechanism.
A direct impingement system is the military standard, but will require more cleaning.
The gas block is the valve that controls the gas going up the tube. When it comes to gas blocks, you have two options: adjustable and non-adjustable. Adjustable gas blocks allow you to tune the amount of gas that gets let up the gas tube and back into the receiver.
A non-adjustable gas block can’t be tuned and is generally considered safer for beginners as you won’t have to worry about tuning your rifle incorrectly. Default setups usually let more gas through than is necessary and this can lead to wear over time.
Another choice is between low-profile gas blocks or front sight blocks. The latter is the classic A-frame option with the front iron sight on top. These work best with drop-in handguards.
Generally speaking, a mid-length or carbine gas system will fit most AR-15s. Pistol and rifle gas systems are designed for custom builds using special ammo like .300 Blackout. If in doubt, go mid-length.
| Gas system | Barrel length | Gas system length |
|---|---|---|
| Pistol | Less than 10″ | 4″ |
| Carbine | 10″ to 18″ | 7″ |
| Mid-Length | 14″ to 20″ | 9″ |
| Rifle | More than 20″ | 12″ |
The lower receiver is one of the most important sections of your AR-15 and you’ll need the following components, which are often available as part of a kit. The best AR-15 lower parts kits come with high-quality components and you do not need to worry about pins not fitting, or quality control problems emerging later on. Buying a kit from a reputable manufacturer helps guarantee that you’re getting a quality, reliable product.
An 80% lower is a lower receiver that hasn’t been fully machined to completion. The lower is the only part of an AR-15 that is legally registerable as a firearm. Because it’s unfinished, an 80% is not yet legally registerable. That allows the buyer to get around extra taxes, fees, and waiting periods when buying it.
To complete an 80% lower, you’ll need to mill out the fire control group. You can do this yourself or give it to a gunsmith.
Check out The Arms Guide How to on Finishing an AR-15 80% Lower Receiver here.
Complete lowers are pre-assembled with the trigger assembly, safety, and mag holder in place. A complete lower can also have a buttstock and buffer tube. A stripped lower is just the fully-machined lower receiver without the extra parts added on. Both complete and stripped lowers are serialized and are thus considered firearms.
An 80% lower isn’t considered a firearm and you could buy one now and have it delivered tomorrow without any hassle. Obviously, complete lowers are more convenient for beginners, though 80% lowers will be best for those who want to avoid taxes or BS paperwork.
These accessories can make your rifle look cool and ensure that it’s comfortable for you to shoot. A good quality AR-15 stock is essential for comfort and stability when shooting. The furniture includes the parts that make the most contact with you, and which transfer any recoil to your shoulder, especially if using an alternative caliber, so make sure your furniture suits you perfectly.
You can also add a brace to your AR-15, which attaches to your arm and improves stability. There are many options when it comes to dressing up your AR-15, we recommend that you physically try some out in a store or at the range so you can determine which is most comfortable for you. Standard stocks are fortunately adjustable.
Pistol grips can be customized in various ways, for example, to have finger dips or to be flat, depending on your preference.
Here’s our list of the best AR-15 pistol grips. You can also consider getting an AR-15 pistol brace.
The buffer, buffer tube and spring must be balanced to the amount of force transferred from the gas system. A 16″ barrel chambered in 5.56/.223 will usually require a standard (or ‘carbine’) buffer tube. It’s 7-inches long and weighs exactly 3 pounds. You’ll probably want a standard buffer spring.
The right trigger will improve your accuracy and control. Many shooters say that the trigger is the most important thing that you can upgrade on your weapon.
Single-stage triggers are simple: you pull back and the gun goes bang. This makes them ideal for quick repeating shots.
Dual-stage triggers have an initial stage where you pull back some of the slack and then a second, usually much lighter trigger pull, that fires the round. This means you can fire without the weight of the trigger pull throwing your aim off.
Here’s our list of the best AR-15 dual-stage triggers
These are pre-assembled trigger assemblies that you can quickly install into your AR-15 without much hassle. They’re assembled to the highest standards, offering no real down-sides.
These triggers allow you to change the pull weight of the trigger. This means that you can have a lighter weight for long-distance target shooting, and a heavier weight for, say, home defense when a slip of the finger could be fatal.
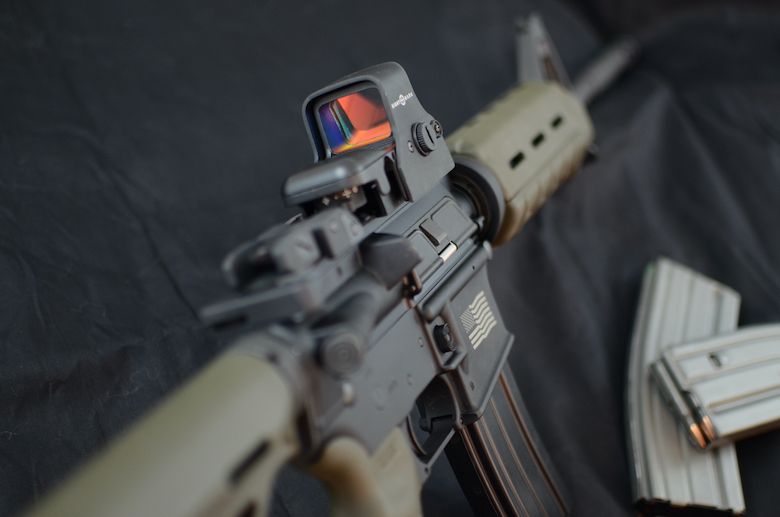
Your AR-15’s sights will play a huge role in how accurate you can shoot at longer distances. There are many types of scopes and optics on the market, each with their own benefits and drawbacks. What you will use your rifle for will determine which sighting system you’ll want.
They might seem a little unadventurous, but many people still value the classic iron sights. There is nothing more reliable than iron sights. If you want your AR-15 to look like the classic version or the M16 rifles used in the Vietnam War, then having an A2 upper with a carry handle will give you the best run at it.
Best Night Vision Scopes for AR-15
Best AR-15 Long-Range Scopes
Best Leupold Scopes for AR-15
When you’re shooting long-distance targets and hunting, a scope will be what the doctor ordered. Scopes for AR-15 rifles come in all kinds of magnification levels, from 4x to 20x and everything in-between. Scopes have different reticles, some of which will help you to judge a bullet’s windage and drop at different ranges.
The classic red dot sight reflects an LED beam of light onto the front glass of the optic and back into your eye. It’s excellent for mid-range shooting. Although magnification is an option, the dot may then take up too much space on your target.
Holographic sights are similar to red dot sights, but they use different technology and tend to have a circle around the dot in the reticle. The laser hologram technology behind holographic sights means that the reticle is seemingly placed in front of the sights and superimposed onto the target.
This makes it quick and easy to acquire targets. The reticle also stays the same size when magnified, meaning these sights are better suited to hunting and shooting at a distance. You can smash out the front glass on the optic and the holographic sight will still work.
We’ve reviewed the best holographic sights for your AR-15
There are several tools that you can attach to your muzzle, here are the main ones to consider.
If you’re new to this game, then you’re no doubt finding yourself dumbfounded at some of the words shooters are throwing out there. Here’s your guide to some of the AR-15 lingo.
M4 feed ramps are cuts in the barrel extension and upper receiver that make it easier to feed rounds from the magazine. They come in two main types, ‘rifle’ and ‘M4.’ Just make sure that you never use a barrel extension cut with rifle feed ramps with a receiver that has M4 feed ramps.
Whether you choose a low-profile gas block or a front sight base will depend on what handguard you want to use. Classically styled AR-15s feature front sight bases clamped to the barrel, while shooters who install a free float handguard will opt for a low-profile gas block.
Top rail T-marks are the markings on top of a Picatinny rail. These markings make it easy to remember exactly where to re-attach an optic or other accessory in case you remove it. Whether you want this or not really comes down to personal preference.
M-LOK stands for Modular Lock and it’s an alternative rail system that is popular thanks to its cheaper cost and compatibility with plastic handguards. It’s lighter than the classic Picatinny rail system and more widespread than the KeyMod system.
If you’re wondering what to mount on your rail, check out our list of the best AR-15 flashlights
There is a whole world of AR-15 components out there. Once you’ve built your rifle, check out the best AR-15 accessories to add to it.
You’ll notice people talking about whether it’s best to have a mid-length, carbine, or rifle length barrel and gas system. Most people opt for mid-length or carbine. You should stick to matching the gas system length to your barrel to ensure the best performance.
| Gas system | Barrel length | Gas system length |
|---|---|---|
| Carbine | 10″ to 18″ | 7″ |
| Mid-Length | 14″ to 20″ | 9″ |
| Rifle | More than 20″ | 12″ |
Once you have all your parts together, you’re going to need somewhere to assemble them. The kitchen table isn’t going to be ideal, let’s face it. You’ll need somewhere where you can spread all the parts out and not have to waste time packing them up at the end of the day. A distraction-free workspace with a workbench is essential.
You can easily build an AR-15 without any assistance from a gunsmith, but you’ll need to have the right tools at hand.
You’ll need to use roll pins in your lower assembly, and this will require a roll pin punch. Trying to secure these pins in place without this tool is only going to end in tears.
An armorer’s wrench will be necessary if you’re installing your own barrel and handguard, buffer assembly, and more. It gets its name for good reason, so make sure you have one.
An action block clamps the lower receiver into a vice. You simply insert the action block into the lower receiver and then clamp it on.
You’ll need to have proper vices and clamps to secure the various parts of your AR-15 when working on them. Trying to put together your receivers without a vice and clamp is just a fool’s task.
You’ll need these to install various components during your AR-15 build.
Building an AR-15 can be a messy process, and having a gun cleaning mat at hand will ensure that you don’t ruin your work surface with grease and oil, and it’ll prevent you from scratching your weapon on hard surfaces.
You’ll need a proper gun cleaning utility brush to clean your AR-15 without scratching it. You’ll also need one of these to be able to reach the grease in all the nooks and crannies.
In order to keep all your parts in place when you’re working on them, you may want to invest in a gunsmithing fixture. This helps to hold everything in place.
No tool bench is complete without a trusty hammer.
With so many components to put together, a reliable set of screwdrivers will be needed.
It’s important to wear shooting glasses even when you’re building your AR-15 to protect against solvents, debris and flying springs.
Finally, you’ll need an Allen wrench set to tighten all the nuts and bolts.
Now that you’ve got all your parts together and you’ve established a workspace, it’s time to get on with building your AR-15.
This will help you identify all the parts and names. Many gun cleaning mats come with an AR-15 schematic on them.
Note: the following relates to free float handguards. Yours may differ.
Your upper assembly is now complete and can be attached to your lower assembly.
The lower receiver isn’t too tricky to put together, so let’s get started on some of the easier parts and work our way through.
Here are our picks for the top AR-15 trigger guards
You’ve installed your trigger guard, but are you ready for the next step in building your AR-15 lower receiver? More info for you on How to Build an AR-15 Lower Receiver: Bolt Catch
Now that you’ve built your AR-15, check out the best accessories to use with it!
Many questions will arise when you’re building your AR-15. Here are some of those we’re most commonly asked.
Q: Do I need to be licensed or a gunsmith to build an AR-15?
No, but some skills and tools help if you want to mill out an 80% lower.
Q: Is it legal to build an AR-15 at home?
Yes, it’s totally legal.
Q: Do I need an FFL or background check to build an AR-15?
Yes and no. You can do everything without an FFL or background check except purchase a lower receiver. You can buy an 80% lower to get around the checks.
Q: Does the AR-15 I build need a serial number?
No, unless you live in California, then yes. Always check the most recent state regulations.
Q: Do I need to register the AR-15 I build?
It depends on your state. Most of the time you won’t have to, but in New York you will. Check local state registry laws.
Q: What are the most common mistakes on first-time AR-15 builds?
Nuts and bolts are loose or over-torqued; wrong combinations of parts such as barrel and gas tube lengths; and mashed up springs.
Q: How many AR-15s can I build?
As many as you want.
Q: If I build an AR-15 for myself, can I sell it later?
The private sale laws cover selling home-built firearms. Make sure you check your state laws.
Q: Can I buy all the parts I need to build an AR-15 online?
Yes.
Q: What is an 80% lower and why do I need one?
The lower receiver is the only part that is legally considered a firearm. 80% lowers are incomplete, and thus they aren’t considered firearms and you won’t need any FFL or background checks to buy one online.
Q: What are the differences between forged, billet, and cast receivers?
Forged receivers have been hammered into shape while red hot, as have cast receivers. Billet receivers are made from a single block of metal and tend to be stronger, more aesthetically pleasing, and cost more.
You do not always have to go to a gun store to purchase an AR-15. Surprised? I know I was when I first ventured into the hobby of building custom AR-15s. Some of you may not know, but building your own AR-15 is actually quite simple. However, if you do not know anything about the process, or where to start, you have come to the right place. I am going to start this “How to Build an AR-15” series off with a list of frequently asked questions that I receive from individuals starting out with the hobby and possibly wanting to build their first AR-15.
WARNING! Building AR rifles is highly addictive. Once you start this process, you will find excuses to build .308 ARs, AR pistols and long range precision rifles. You have been warned.
Q: Are there any rules or laws for building my own AR-15?
A: Only the same ones that apply to purchasing a factory assembled AR-15 in your state.
Q: Do I need to register my AR-15?
A: There is currently no Federal firearms registry, but you’ll need to verify the registry laws by state (e.g., New York does require a registry of “assault rifles,” including standard AR-15 rifles).
Q: Do I need to be licensed or be a gunsmith to build my own AR-15?
A: Not unless you’re milling the lower receiver yourself.
Q: How many AR-15s can I build?
A: As many as you would like to—whichever comes first.
Q: If I build an AR-15 for myself, can I then sell it?
A: The same laws for private sales of firearms apply to selling AR-15 rifles. Check your state laws.
Q: How do I buy a “stripped” or “blank” AR-15 lower receiver?
A: You will need to find a dealer that sells AR-15 lower receivers. Said dealer can be local to you, or online.
Q: Can I buy all the parts online and have them shipped to my home?
A: This is a long one, so get comfortable. Yes and no. All of the components for your AR-15 build can be shipped directly to you at your home except the lower receiver.
The AR-15 lower receiver is the only component that is considered the “gun”. Therefore, when purchasing a lower receiver for your AR-15 build, you will have to go through the same channels as when purchasing a firearm in your state.
For example, in my state of Minnesota, if I order a stripped AR-15 lower receiver online, I will have to provide the seller with a copy of an FFL (Federal Firearms License) and the address to aforementioned FFL. In other words, I just have to call my local gun shop and ask them to fax a copy of their FFL to the seller. The seller will then collect money from me for the receiver, and then ship it to my local gun shop. When the gun shop calls me to tell me that my lower receiver has arrived, I will go there and fill out the ATF form to make sure I can legally own a firearm, pay a transfer fee (this fee is usually less than $30), and take my new AR-15 lower receiver home (thankfully, Minnesota has no waiting period for long gun purchases).
If I decide not to order online, and I know of a gun shop that stocks lower receivers nearby, I can just go purchase it directly from that store, and then fill out the necessary ATF form, just as I would for purchasing any other kind of firearm.
Q: What parts make up an AR-15 that I would have to purchase to build one?
A: There are a variety of different types of AR-15 builds, so this list will not work for all builds. However, I put together a list of components for building a typical M-4 style AR-15 with a stripped lower receiver, and stripped upper receiver:
Q: What is the difference between a forged lower receiver and a billet lower receiver?
A: With a forged lower receiver, the metal is “smashed” into the desired form while it is red hot. This compresses the metal and makes it very strong.
Billet lower receivers are machined from a single block of metal and tend to have a more custom, aesthetically pleasing appearance to some. It also tends to have the trigger guard built in, meaning it is not removable. They also tend to cost considerably more than a forged lower. Billet lowers may not have quite the tolerance that forged lowers, but by no means are they to be considered “weak.”
Q: How do I know which lower receiver to purchase? What “brands” are good?
A: There are a tremendous amount of different lowers out on the market, but not every lower is made by the company that has its name on the side. You would be surprised at how many lowers from different companies actually come from probably less than a dozen machine shops.
At present, this is the list of which manufacturers produce lowers for which companies:
Lewis Machine & Tool
Continental Machine Tool
LAR Manufacturing
JVP
Mega Machine Shop
Olympic
Sun Devil
Superior
Aero Precision
Considering that almost all AR-15 lower receivers are made to a very specific tolerance, based on military specifications (mil-spec), my advice is to choose whichever AR-15 lower receiver that has a roll-mark (or logo) that you think is “coolest” or is most appealing to you personally.
Q: Some barrels say they are chambered in 5.56 and some say they are chambered in .223. What is the difference?
A: Basically, the rule of thumb is this: a rifle chambered for 5.56 can shoot both 5.56 and .223 ammunition. A rifle chambered for .223 can only shoot .223 and not 5.56. For the full story on 5.56 vs. .223, check out this article by Destinee.
Q: What does barrel twist mean? 1:7 and 1:9? Ratio? What?
A: Confused? Yeah, this one is kind of technical but I will keep it simple. When choosing a barrel twist ratio, you will want to choose one that best matches the type of ammo you would normally be shooting. What the ratio means, such as 1:7 for example, is that when the bullet travels down the barrel, it will make one complete spin (via the rifling) every seven inches.
This is one of the most hotly debated topics about AR-15 rifles. Personally, I chose to go with 1:7 because it gives me the option of shooting the heavier rounds. Because 55gr .223/5.56 is the most common bullet weight available (that’s the weight used in XM193 military ball 5.56×45 ammo), and the most frequently fired, you would be fine with either 1:7 or 1:9. I have also been told by reputable sources in law enforcement that 1:9 is recommended for plinking, and 1:7 for hunting and home defense.
To break it down, 1:7 will do just fine with shooting lighter and heavier rounds. 1:9, on the other hand, will handle lighter rounds better, and will not do so well with anything heavy at long distances. (Fig. 1a)
Q: What does carbine, mid-length and rifle length mean when choosing a barrel?
A: It simply means where the gas port in the barrel is placed. It is also sometimes referred to as the “gas-system”. Carbine and mid-length gas systems tend to be on barrels of 16-18 inches and shorter, while barrels with a length of 20 inches and longer will have a rifle-length gas system.
It is important to know what length gas system your barrel has because the gas tube you purchase will need to be the right length in order to fit properly. For example, you cannot fit a carbine length gas tube onto a barrel with a rifle-length gas system. The gas tube will be too short.
Q: I am ready to build my AR-15 lower receiver but I do not know the steps. How do I do it?
A: Great question. In the following posts in this “How to Build an AR-15” series, I will go over how to build your AR-15 (starting with building your lower receiver and moving from there to the AR-15 upper), what tools you will need, and I’ll offer some helpful tips along the way. Stay tuned.
Filed Under: AR-15
© Copyright 2020 Thearmsguide · All Rights Reserved.
Affiliate disclosure: As an Amazon Associate, we may earn commissions from qualifying purchases from Amazon.com.