The Arms Guide
  • Home
  • AR-15
  • Rifles
  • Handguns
  • Reloading Gear
  • Gun Safes
  • About Us
Home » AR-15 » How to Build an AR-15 Upper Receiver – Barrel

How to Build an AR-15 Upper Receiver – Barrel

AR-15 Upper Receiver Barrel Installation - thearmsguide.com

Last Updated on June 19, 2021, Published on May 28, 2020 by The Arms Guide 8 Comments

When building a custom AR-15 upper receiver, installing your barrel is actually one of the easier things to complete. Make sure and read the article that covers what tools you will need to build your AR-15 upper receiver and then grab the following items: your barrel, your barrel nut, torque wrench, barrel nut wrench and AeroShell 33ms grease.

AR-15 Barrel Installation - thearmsguide.com
This shows how some may choose to place the barrel directly into the vise. This image is taken directly from the technical manual.

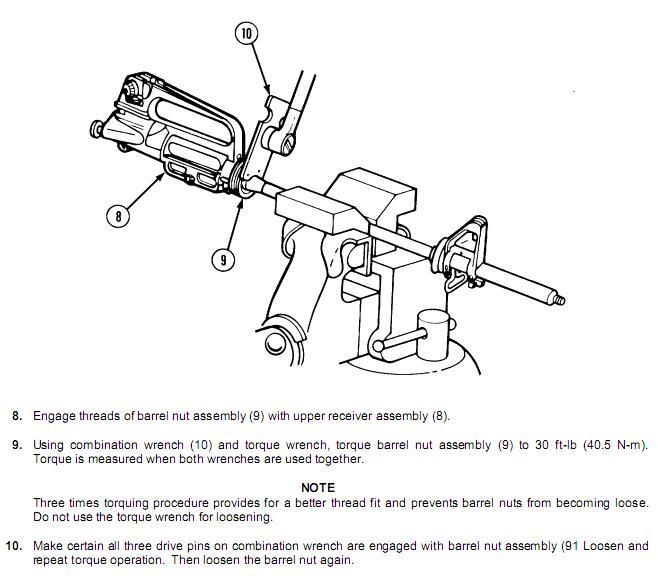
If you decide to install your own barrel into your AR-15 upper receiver, it is important to make sure your upper receiver is well supported to be able to withstand the stress it will have to endure when you’re torquing down the barrel nut. In the image to the left from the technical manual I use, you can see that you may also opt to place your barrel directly in the vise. However, if you are not careful, you could damage your barrel significantly. I have used an upper receiver vise block in the past without issues, but I have since obtained a Geissele Reaction Rod which I am more confident using and will continue to use in the future.

With that said, let’s get your upper receiver or barrel secured in a fashion you are comfortable with, and lets get that barrel installed, shall we?

AR-15 Upper Receiver Barrel Installation - thearmsguide.com
Step 1: Coat the inside of the upper receiver and the outside of the barrel extension generously with AeroShell 33MS. This will prevent corrosion and will aid with ease of installation of the barrel into the upper receiver. Pay close attention to line up the index pin on the barrel with the notch on the upper receiver.
AR-15 Upper Receiver Barrel Installation - thearmsguide.com
Step 2: The tolerances of both your upper receiver and barrel extension may vary, but the barrel should fit nice and snug. It may take quit a bit of hand strength to get the barrel into the upper receiver all the way. You may need the assistance of a rubber mallet, but do not strike the barrel; you will have to tap the rear of the upper receiver with the barrel secured in place in the vise.
AR-15 Upper Receiver Barrel Installation - thearmsguide.com
Step 3: There are many types of rails and barrel nuts available on the market. For my build, I used a Wilson Combat TRIM rail. The TRIM rail uses a specific barrel nut and requires the use of a crow’s foot to install it. The process is the same for most every barrel nut, so don’t worry if you’re installing a different rail.

Liberally apply AeroShell 33MS grease to both the threads of the barrel nut and the upper receiver, slide the barrel nut over the barrel, and hand tighten the nut. Using the torque wrench and barrel nut wrench, torque the barrel nut to 30 foot pounds.
More than likely, exactly 30 foot pounds will not allow for proper gas tube alignment with the barrel nut, so I typically “season the threads” by tightening, loosening and re-tightening the barrel nut a few times.

Continue to check for proper gas tube alignment that is specific to your barrel nut. This generally means that when the barrel nut is timed correctly, the gas tube will be able to move straight and without hangups through either a notch or hole in the barrel nut and into the upper receiver.

Once you torque the barrel nut to the initial 30 foot pounds, set the torque wrench for 80 foot pounds and continue to tighten the barrel nut until the correct timing is achieved. More than likely you will not reach the mil-spec cut off of 80 foot pounds before the barrel nut is properly timed. If you do end up reaching the 80 foot pound limit and your gas tube alignment is still no good, you may have to use a shim.

AR-15 Upper Receiver Barrel Installation - thearmsguide.com
This is what my upper receiver build looked like with the barrel installed and the barrel nut correctly timed. My barrel nut only took approximately 55 foot pounds, but each barrel nut is different.

Be sure to check back next week for when I explain how to install the gas tube into the gas block and install it on the barrel.

Filed Under: AR-15

Related Posts

  • Best Budget Ar15
    8 Best Budget AR-15 Rifles in 2023
  • Best Ar 15 Cases
    The 8 Best AR-15 Cases Reviewed (Hard and Soft Rifle Cases)
  • Best Ar 15 Lower Parts Kits
    Best AR-15 Lower Parts Kit in 2023

About the Author

Avatar for The Arms Guide

The Arms Guide

About us

Comments

  1. Avatar for The Arms GuideMichaelMeador says

    July 17, 2015 at 10:46 pm

    I read the comment about the correct torque value should be adjusted when using the wrench extension inline with the wrench in both the picture and the illustration. You could calculate that but the easiest way is to turn the wrench 90 degrees in the extension and the true torque will be almost exact number as specified.

  2. Avatar for The Arms Guideedwardelricust says

    May 3, 2015 at 4:04 pm

    How do you check head space?

  3. Avatar for The Arms GuideTonyJoe1 says

    January 27, 2015 at 4:44 am

    Nate Schultz 
    Doesn’t the AR bolt space itself with barrel do to its design or is that just internet hearsay?

  4. Avatar for The Arms GuideGrfxGawd says

    August 5, 2014 at 10:19 pm

    I’ve discovered one, sort of expensive, but really helpful trick when building your own AR. I own every tap and die for every threaded part of the gun – all of it. And I always chase my threads. I’ve become nearly immune to surprise at finding minor to major issues even on parts from some of the most respected names in the industry. Insuring both parts being mated are unequivocally threaded to identical spec can make the difference between a build that’s a bust, and a build built to last.

  5. Avatar for The Arms Guidegonalln says

    August 5, 2014 at 4:27 pm

    your welcome. I am new to this so detail is important until I learn enough to know when to slack off
    But seriously Thank you for responding mighty nice.
    also where did you get the vise block I do not see the link here.
    Also I can get either lower from a friend, WHich would you recommned building ar10 or 15
    I do have many weapons alredy just want more. LOL

  6. Avatar for The Arms Guidegonalln says

    August 5, 2014 at 3:17 pm

    you need to add to the tourque number casue of the extention. you have over tourqued your barrel

  7. Avatar for The Arms GuideNate Schultz says

    July 13, 2014 at 5:25 am

    ComDet 50 is what the specific torque value was for the Wilson Combat TRIM Rail barrel nut. Also, I am always a proponent for checking headspace. Better safe than sorry.

  8. Avatar for The Arms GuideComDet says

    December 31, 2013 at 1:29 am

    Upper limit torque spec 50 as per video or 80 as per the writing? Also, what about headspace?

Leave a Reply

Your email address will not be published. Required fields are marked *

In Case You Missed It

Best Biometric Gun Safe
Gun Safes

Best Biometric Gun Safe For Pistol & Rifle Storage 2023

August 15, 2022

Best 300 Win Mag Rifles Featured Image
Rifles

7 Best 300 Win Mag Rifles For 2023

June 11, 2022

Best Ar 15 Slings
Handguns

Best 9mm Glock Models Reviewed

June 2, 2022

Best Bedside Gun Safes Featured
Gun Safes

Best Bedside Gun Safes For Quick Access 2023

May 22, 2022

© Copyright 2023 · The Arms Guide · All Rights Reserved.

  • Contact Us
  • Privacy Policy
  • Terms of Use
  • About Us

Affiliate disclosure: As an Amazon Associate, we may earn commissions from qualifying purchases from Amazon.com.