The Arms Guide
  • Home
  • AR-15
  • Rifles
  • Handguns
  • Reloading Gear
  • Gun Safes
  • Gun News
  • About Us

How to Build an AR-15 Upper Receiver – Forward Assist

AR-15 Forward Assist Install - thearmsguide.com

Last Updated on October 20, 2021, Published on May 28, 2017 by Matt 4 Comments

Last week, we started our AR-15 upper build with laying out the tools we’ll be using. It is now time to start pounding some stuff and getting things installed into your AR-15 upper receiver. Specifically, I will be covering how to install the forward assist into a stripped upper receiver. Remember that not all AR-15 upper receivers have forward assists, so if yours does not have one, you can skip this step. Also, keep in mind that I, and The Arms Guide overall, assume no responsibility for any laws or regulations you may violate or any injuries you may cause. You are responsible for your safety and for following your local laws. All right, let’s get that forward assist installed.

Items Needed

To install the forward assist into your AR-15 upper receiver, you will need the following items (which I went over in last week’s article):

– Forward assist

– Forward assist spring

– Forward assist roll pin
AR-15 Forward Assist Install - thearmsguide.com
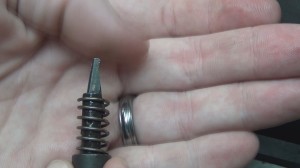
Be sure to install the spring correctly over the forward assist before you begin pounding in the roll pin.

– Upper receiver vise block

– Roll pin starter

– Roll pin punches (3/32″)

– Brass or synthetic hammer

Installation Process

Installing the forward assist is a quick and easy process.

Sliding the forward assist spring over the forward assist will be the first thing you do. Without this spring installed, you will have no spring tension and you will have to re-install the forward assist, so make sure to place the spring correctly before anything else. Now with your AR-15 upper receiver in a vise block, or at least secured in place by something that will not damage your upper receiver, slide the forward assist into position with the “tooth” curving inward.
AR-15 Forward Assist Install - thearmsguide.com
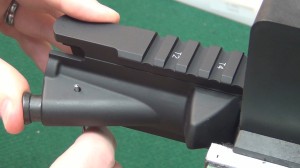
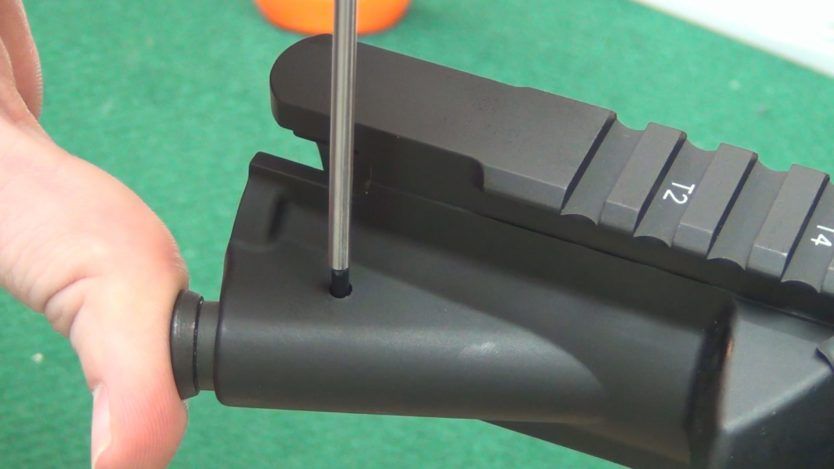
Notice how having the roll pin punch coming up from the bottom keeps the forward assist in place.

Once you have the forward assist in position, push a roll pin punch through the hole on the under side of the upper receiver and capture the forward assist in place. This will assist with keeping everything lined up when you move on to the next step.

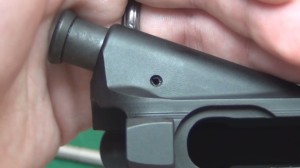
Grab the forward assist roll pin and a roll pin starter and begin tapping the roll pin into place with the hammer from the top of the receiver. It is important to check the forward assist for proper function by pushing it during this process. This will make sure you are not binding or catching the roll pin on anything. Use the roll pin starter and your small hammer to drive the roll pin into the upper receiver enough to hold the forward assist in place and then utilize the 3/32″ roll pin punch to finish driving the roll pin into place. Once finished, the roll pin should be flush with the top of the upper receiver.
AR-15 Forward Assist Install - thearmsguide.com
Once installed, the forward assist should be held in place and the installed roll pin should be flush with the upper receiver.

Perform a function check and make sure there is no binding of the forward assist. The forward assist should push in smoothly and the spring pressure should allow it to release back out easily. If the forward assist works as it should then you are ready to move onto the next step: installing the ejection port cover, which will be the subject of next week’s article. Be sure to check back then for the next installment.

Filed Under: AR-15

Related Posts

  • Best Ar 15 Cases
    The 8 Best AR-15 Cases Reviewed (Hard and Soft Rifle Cases)
  • Best Ar 15 Lower Parts Kits
    Best AR-15 Lower Parts Kit in 2022
  • Best Ar15 Under 1000
    Best AR-15 Under $1000 in 2022

About the Author

Matt Matt is a multiple war veteran with a wealth of knowledge in combat and defensive shooting tactics. He enjoys building his personal firearms collection and looks forward to introducing new product reviews to The Arms Guide audience.

About us

Comments

  1. Avatar for MattNate Schultz says

    July 13, 2014 at 5:23 am

    GrfxGawd I agree!

  2. Avatar for MattGrfxGawd says

    July 12, 2014 at 1:39 pm

    Concerning roll pins – If there’s a “top” and a “bottom” I can chose from, I install my pins from the “bottom”. Whatever angle will help minimize visibility of any surface damage I may accidentally inflict in the process of installation. Even on the pins surface itself, just to preserves aesthetics. If I don’t gunkote or otherwise apply another finish I always go back with cold bluing (ferrous parts) or alumiblack (ie: Casey Birchwood Aluminum Black) over any surface imperfections. It’s not just an OCD thing, those surface treatments are better than leaving raw exposed metal.

  3. Avatar for MattNate Schultz says

    November 24, 2013 at 5:27 pm

    gpthomas10 I wouldn’t go thaaaat far, G 😛

  4. Avatar for Mattgpthomas10 says

    November 24, 2013 at 1:12 pm

    Nate is the master!

Leave a Reply

Your email address will not be published. Required fields are marked *


In Case You Missed It

Judge,gavel,and,gun,on,usa,flag.,gun,law,concept
Gun News

Gun Control Looms After Texas Bloodbath

May 25, 2022

A,gun Free,zone,signpost,on,a,fence.,gun,control,in
Gun News

Nevada Takes a Stand Against Gun Free Zones

May 24, 2022

Supporters,of,the,extreme,far Right,golden,dawn,party,celebrate,after
Gun News

The Real Big Lie About White Supremacy and Gun Violence

May 23, 2022

Berkeley,,ca, ,august,27,,2017:,unidentified,participants,at,the
Gun News

Antifa’s Growing Use of Guns

May 22, 2022

© Copyright 2022 Thearmsguide · All Rights Reserved.

  • Contact Us
  • Privacy Policy
  • Terms of Use
  • About Us

Affiliate disclosure: As an Amazon Associate, we may earn commissions from qualifying purchases from Amazon.com.