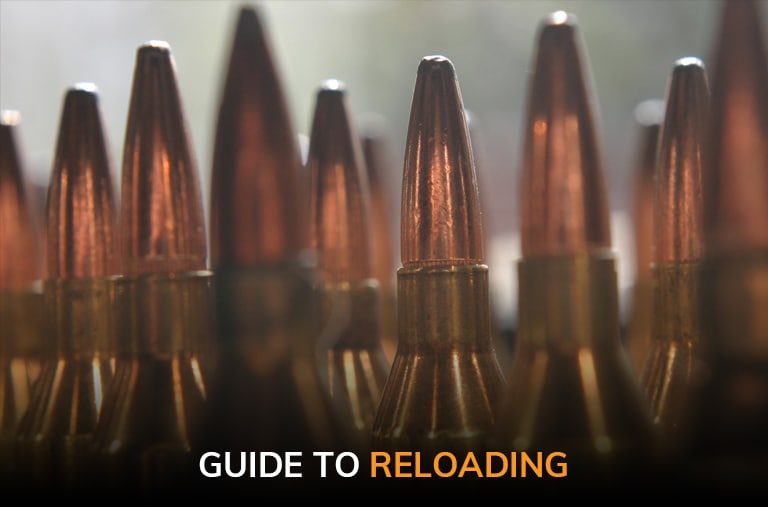
Every serious shooter has at least thought about doing it. Reloading, or handloading, is a great way to get the most out of your shooting experience. If you’re into extreme high-accuracy competitive shooting, reloading is a must. If not, you can still tune your cartridge loads to get the greatest possible performance out of your firearm.
Top Reasons to Reload Your Own Ammo
Better Accuracy and Performance
It’s a great way to get around the occasional shortages in manufactured ammunition. Storebought ammo is pretty great these days, but, besides improving accuracy and performance, by reloading you can increase the consistency of your rounds, which can make all the difference in competition shooting.
You also get to choose from a wider range of propellants, or powders, and projectiles, or bullets than those that are available in storebought ammo. If you are training a novice shooter who hasn’t yet grown into his or her boots, you can choose to load rounds with a light powder load to reduce recoil. Then, they can graduate to standard loads as they get the hang of things. Conversely, you can push the power of cartridges by reloading ‘hot’ wildcat rounds, but you better know exactly what you’re doing.
Save Money
Will you save money on ammo if you reload?
That’s a tough question. Most shooters find that they cancel any cost savings from reloading by shooting more. You will have a substantial initial capital outlay to recoup. If you’re going for the greatest possible accuracy, you’ll have extra expenses for better equipment and components. You will also end up spending a lot on experimentation until you find the right loads for your gun. However, if you buy components in bulk, you will end up saving money.
For Fun
Besides greater accuracy, reloading can be a fun and highly educational experience in itself. It can be a life-long pursuit and a great way to pass the time between competitions or hunting seasons. If you have a rare, antique gun for which ammunition is no longer sold, you may have no choice but to reload.
How Reloading Works
Reloading is simply the process of researching what the best combination of these four components is for your firearm and purposes and putting them together in the safest and most effective way.
There are a lot of safety concerns regarding reloading, it’s not something you do over a couple of beers. First, trying to fire rounds that have been improperly reloaded can cause your barrel to explode, killing you. Besides, there are a lot of safety concerns during the reloading process. A lot of the chemicals involved are corrosive and/or explosive.
Use proper protection, like gloves and safety glasses, and keep careful track that you are using the right volumes of the right powders with the correct components for your weapon. If you choose to cast your own lead bullets, you will face a whole new slew of safety considerations regarding ventilation and molten heavy metal.
Parts Of The Cartridge
Both handgun and rifle cartridges have four main components:
- Primer
- Brass
- Propellant
- Projectile
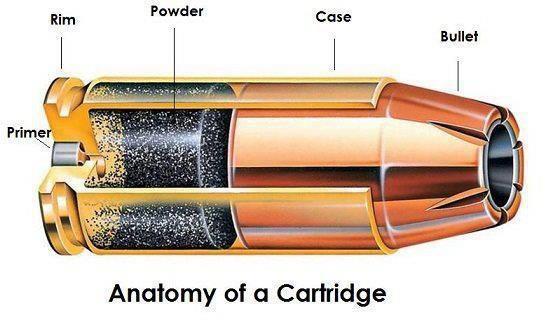
Primer
All handgun and rifle cases have a neck that holds the bullet, an internal chamber for the powder. A primer pocket holds the primer and a flash hole through which the primer ignites the powder.
Primers are about the size and shape of a small pill. They are made of metal and contain a special priming compound. Most primers used today are ‘boxer style,’ and come in two sizes, big and small. It is unrealistic to reload rimfire cartridges like .22LR, which do not have a replaceable primer.
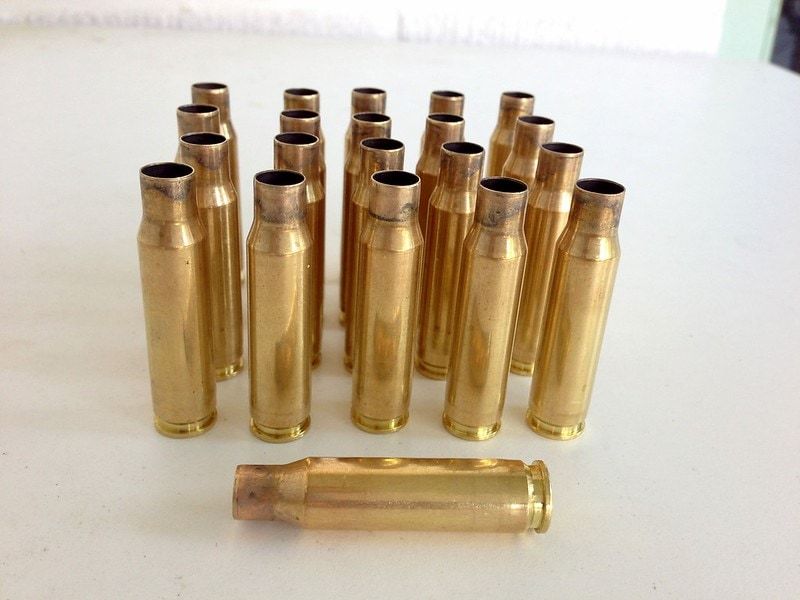
Brass
The brass case is the component that is most specific to the chamber of your gun. Cases are made of brass and can be reloaded over and over. Don’t try to reload military surplus steel or aluminum shells.
Stock up on quality brass. You have choices of manufacturers, but not much else to consider here. The case is also the component that requires the most attention in the reloading process, which we’ll get into below.
Propellant
Even though cartridge shell technology hasn’t changed much in over a century, propellant, or powder technology has evolved substantially, giving you a huge range of options to choose from. You will have a choice of several different powders. Different powders burn faster or slower and are suited to different types of shooting. It is essential that you choose a suitable powder for your gun and measure out the right amount. This is one of the key steps to ensure safe, effective shooting.
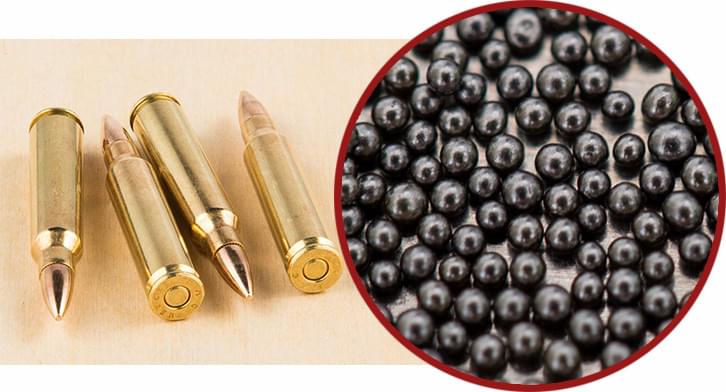
Projectiles
Projectiles, or bullets, come in different calibers, or diameters. That means that you don’t go out and buy .30-06 bullets for reloading, but simply .30 bullets that can be used in a .30-06 round or potentially in a .308, depending on the bullet weight.
Bullet weight is usually measured in grains. This is where a lot of opportunity for customization comes in. Different shooting applications require different bullet weights, so you’ll have to do your research. It’s all part of the fun.
Besides, there is a huge variety of bullet designs to choose from. A lot of it has to do with terminal ballistics, meaning, what happens when the bullet hits its target. For example, to kill an animal, you want a bullet that will expand and immediately dump a large amount of energy, mortally wounding the animal and hopefully immediately knocking it down.
Reloading Equipment
There is a huge range of equipment that you need for reloading, or that will at least make the process much easier. The most vital equipment is the reloading press, reloading dies, shell holders and a place to reload.
There is a myriad of ways to approach these tasks and many manufacturers who produce the necessary equipment. I am not going to be pushing any particular approach, and specifically not any one manufacturer’s equipment. The four big boys on the block, let’s call them Red, Orange, Green and Blue, all make a variety of excellent equipment. Whilst some of their equipment may be better for certain reloading tasks than others, your individual decision will depend on a variety of factors including:
- Do you want to reload a pistol, rifle, or both pistol and rifle ammunition?
- How much ammunition are you going to reload?
- Are you time-poor and finance-rich (lucky you)?
- How much space do you have available?
- What is your budget?
My aim is to cover all the issues you need to make an informed decision on approach and equipment. So, let’s get started on the list of 4 tasks above.
Types of Reloading Presses
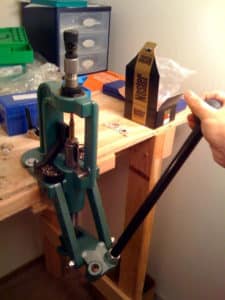
A reloading press is a necessary piece of equipment you need to have on your workbench. A high-quality reloading press will allow you to reload cartridges and shotgun shells for notably less than it costs to purchase new ones.
A reloading press clamps to a workbench and has a long lever you pull to operate it. With each pull, a shell, sitting in a shell holder, is forced into a die, which performs one of several stages of the reloading process, which we’ll cover below. Here are the different types of Reloading Presses.
Single-Stage Reloading Press
A single-stage reloading press is best for beginners because it helps you keep track of each step of the process. With a single-stage, you will load shells in small batches of 20-30 at a time. After one step is complete for the batch, you swap out the die and do the next stage.
→ Best Single Stage Reloading Press Kits
→ Best Reloading Presses For Accuracy
Progressive Reloading Press
With a progressive press, you can do the complete reloading process for each shell sequentially. You put the shell in the shell holder, pull the lever, then rotate a structure holding the shell holder so that the shell will be placed under the next die. Before pulling the lever, put another shell in the first position so that it will go through the first step while the original shell goes through the second as you pull the lever.
It’s much more of an assembly line. Once you get started you’ll have a shell in play at all four stages with each pull of the lever. Then, with every pull, a completed shell will drop out. Progressive presses are a lot more expensive than single-stages.
→ Best Progressive Reloading Presses
→ Best Rifle Reloading Presses
Turret Reloading Press
Reloaders have complete control over every step operated with a Turret Press. A turret press is a type of single-stage press that makes swapping dies as easy as a twist of the wrist. All the dies are mounted on a rotating structure which you turn to move to the next reloading stage.
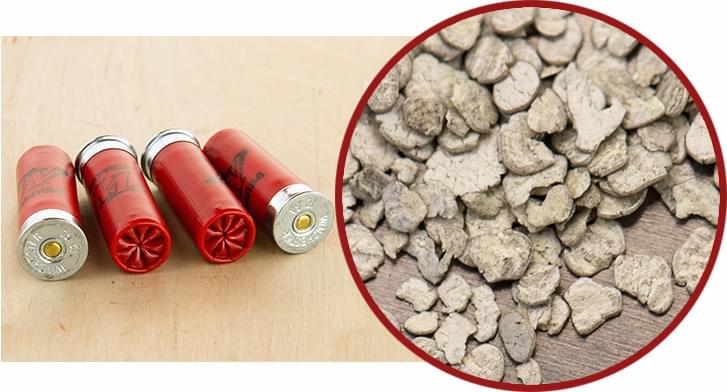
Shotshell Reloading Press
Most standard reloading presses will have no problem switching between pistol and rifle ammo. If you’re going to reload shotgun shells, then you’ll need to get a specialized reloading press. Shotgun reloading presses include the stage to insert the wad and are generally more straightforward to reload with. A standard single-stage or progressive press can’t handle shotgun shells.
Reloading Dies and Shell Holders
Once you have the cases cleaned, most of the remainder of the tasks are handled by a series of reloading tools or “dies.” Reloading dies are the most important components you will need to purchase for your reloading adventure.
There are four steps needed to reload a round of centerfire ammunition:
- Clean and resize the case back to a serviceable size
- Remove the expended primer and replace it with a new primer
- Replace the gunpowder
- Replace the projectile and crimp it into the case
The number of dies you will need depends on the type of cartridge that you will reload. The shell holder and dies are designed for the specific caliber that you are reloading. You can buy different sets for the same press but match your shell holder to the calibers you’ll be reloading.


These dies are basically hollow metal tubes with nifty little additions which perform various tasks. Figure 3 is an example of a three-die set. Dies fall into a number of categories:
- De-capping dies (for removing expended primers)
- Resizing dies (to return the case to its correct diameter)
- Expander dies (to flare the case mouth ready for a new projectile)
- Powder dies (to insert the new powder charge)
- Seating dies (which push the new projectile into the case)
- Crimp dies (which crimp the case mouth to the projectile)
Whilst it is possible to purchase dies that do each of the individual tasks outlined above, most manufacturers combine a couple of these functions together into single dies, e.g., a combined de-capping and resizing die, or an expander and powder die combined.
The only real standard for dies is the mounting thread size, which is most commonly 7/8”-14. These industry standard dies fit most of the commonly used reloading presses. Dies can be bought individually for $25-30, or in sets of 3 (resizing, seating & crimping) for $60-70. Also available are special-purpose dies which do additional tasks, such as primer pocket swaging, case length trimming or powder level checking.
→ Best Reloading Die Sets
→ Best 9mm Reloading Dies
→ Best Reloading Dies for 6.5 Creedmoor
→ Best 308 Reloading Dies
Presses can have a powder meter stage before bullet seating which attaches like a normal die and deposits the correct amount of powder into the case.
Resizing The Case
Resizing the case is accomplished by pushing the case into a resizing die, which is essentially a metal tube the size of the firearms breach. This takes quite bit of force as the case may have expanded significantly during firing. The leverage action of the reloading press handles this with ease.
Resizing is necessary because used shells expand in the chamber. They must be returned to their initial shape before being reloaded. Bullet seating means installing the bullet in the neck of the case. Crimping means tightening the neck to the bullet, protecting the powder, and increasing the pressure upon ignition.
You will need to use tiny amounts of die lubricant on your cases.
Cleaning Cases
Before getting busy on the press, you will have to prepare your brass. The first step is cleaning them. Cases are cleaned by placing them into the tumbler containing the cleaning media and running the tumbler until the cases are clean. I use a simple electric timer to turn the tumbler off after 2 hours, which is usually sufficient.
For that you will use a brass tumbler. You can choose a rotating filled with liquid cleaning chemicals or a vibrating tumbler filled with abrasive media made of walnut shells or corn cob. Both work fine. Ultrasonic tumblers are a more space-age option.
As noted, cases must be resized to a slightly shorter diameter. Over time, re-shot shells will increase in length too. You will need to cut the neck back to the correct length. For that, you will need a case trimmer, which is often like a hand-held lathe. Calipers can come in handy to guarantee uniformity in length. Then you’ll use a chamfer to smooth the hard edge you just cut. If you have really shot a given shell many times, you may even want to use a case annealer to restore its structural integrity.
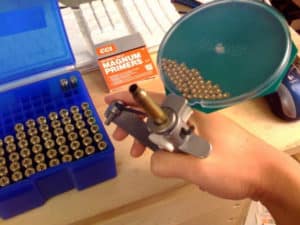
Then, you have to make sure that the primer pocket and flash hole are clean and smooth. For that, you’ll need handheld primer pocket cleaning and uniforming tools. If a priming stage isn’t set up on your press, you’ll probably use a handheld priming tool to insert the primer into the base of the case.
Removing The Expended Primer
The expended primer is removed (de-capped) by passing a small pin down through the centre of the case and pushing the primer out. Figure 4 is an example of a de-capping die. Note the de-capping pin protruding from the bottom of the die. De-capping and resizing are often handled together with a single die.
Replacing the Primer
Before new powder is added, a new primer must be inserted. This may be accomplished using a hand held primer punch tool, or using a primer punch as part of a reloading press. When I address the different types of presses, the relative merits of the two approaches to replacing primers should be apparent.
Replacing the Powder
The exact powder charge is probably the most critical part of the reloading process. A good scale is essential for reloading. Ideally, you want to make sure all of your components are uniform in weight. This is crucial for the powder load. You can use a powder trickler to fine-tune the amount of powder that you are loading.
Stand-alone powder scales, often combined with a powder dispenser, can be used for low-volume rifle reloading. For high volume production using a progressive press, a powder “thrower” is commonly attached to the press, dispensing a regulated powder charge for each case. Even with this automation, a set of powder scales is essential for calibrating the powder thrower and periodically checking the size of the powder charge. Scales can be a simple mechanical beam balance style, or a more sophisticated electronic set.
Powder may be measured and then inserted manually into the case using a powder funnel, or via the powder thrower, which is commonly attached to a special purpose die in a reloading press.
Here are our picks for the best powder scales and powder trickles.
→ Best Reloading Beam Scales
→ Best Powder Tricklers for the Serious Reloader
→ Best Powder Scales For Reloading
A headspace gauge can help you determine the perfect bullet seating depth.
Finally, a bullet puller lets you take cartridges apart. This can help you reuse components or correct any reloading mistakes.
Choosing the Right Powder
What is Burn Rate?
While a gun powder explosion in the cartridge seems instantaneous, if you slow it down you will actually find that each powder has a different “burn rate,” or speed at which it ignites. This is similar to how gasoline burns faster than lighter fluid. Gas burns quickly with a rapid explosion while lighter fluid burns slower and longer. The same effect can be found in different gun powders.
It should be noted that burn rate, does not have a standardized unit of measurement. In fact, burn rate is really only discussed in comparison to other powders; there is no universal yardstick. This makes burn rate a slightly controversial and highly-debated topics, as some reloaders feel that burn rate is less important or practically inconsequential.
Burn rate is important, however, when you are loading magnum vs. non-magnum rounds. Typically, a non-magnum load will use faster burning powders while a magnum cartridge will need slower burning powders. Magnum rounds need to generate greater power. Therefore, they use slower-burning powders, which creates peak pressure for a longer timeframe. This is also needed to give the heavier bullet maximum power and velocity.
Specifics will change by cartridge and bullet type, but in general a fast-burning powder is used for light bullets and low-speed pistols and shotguns. Medium-rate powders are used for magnum pistols, while high-velocity, large bore rifle cartridges will need slow powders, as they deliver the most overall power.
It might seem like an instantaneous explosion, but some powders burn faster than others and you should take this factor into consideration when reloading your cases.
Pistol versus Rifle versus Shotgun Powders
Now that we have a solid understanding of powder characteristics and variables, let’s look over some important information that you need when reloading. This information will help you select the right products for your needs and give you a better understanding for the basic composition of a cartridge.

Pistol Powder
Handgun powder is going to burn faster, giving off the most energy in the shortest amount of time and distance. This is needed because the barrel of a handgun is shorter, so the explosion needs to be completed in about six inches. If you use a slow-burning powder in a handgun, you will likely have a bright flash at the end of the barrel. This flash might look impressive, but that visual explosion is wasted energy.
Rifle powder
Because of the long barrel and increased power demands, rifle cartridges need a powder that burns slower, completing the explosion through the entire barrel and delivering consistent pressure from start to finish. If you use fast-burning pistol powder in a rifle, it will make too much energy at the beginning, giving off high pressures in the chamber. This brings the risk of damaging the gun. Slower powders push the bullet evenly down the barrel and keep pressure down while utilizing the most energy.
Shotgun powder
When choosing a shotgun powder, you will find that there is a lot of variety, largely changing based on the shot load. In general, heavier shot loads will require a slower burn rate, as it takes longer to sufficiently accelerate a heavy shot. If a fast-burning powder is ignited behind a heavy load, it could lead to excessive pressures, damaging the firearm and potentially causing injury. At the other end of the spectrum, a slow burning powder behind a light load, such as a bird shot, may not give enough power for sufficient energy and velocity.
This is an excerpt from Widener’s Reloading and Shooting Supply’s Guide to Smokeless Powder
Used with permission, photo courtesy of Wideners.
Reloading Workbenches and Stands
Whatever the reasons you have for casting, making, and/or reloading your bullets, the first piece of equipment you need to buy is a good, solid, and sturdy reloading bench, and then free up some space in your garage, workshop, or basement.
→ Best Reloading Benches To Keep You Organized
The Reloading Process

You can get a pretty good idea of the reloading process from the equipment descriptions above, but here it is all laid out.
- The first step is to research and consult reloading manuals to determine the best load for your intended purpose.
- If your empty cases are not new, clean them in a vibrating, rotating, or ultrasonic case cleaner.
- Then, ensure that all the cases are free from any cracks or defects. Consider annealing them if their structural integrity is at all suspect. If you are not using carbide dies, lubricate every 5th or 6th case with a tiny amount of lube.
- Resize the cases using the appropriate die on the press. The spent primer will usually be removed at the same time.
- Measure and trim the length of your cases as necessary. Deburr and chamfer the lip of the cases.
- Resize the neck with the appropriate die.
- Use your primer pocket cleaning and uniforming tools and flash hole cleaner to prepare the shell for a new primer.
- Seat a new primer into each case until it is flush with the base of the case.
- Add the correct amount of powder, possibly from a powder measure attached to your progressive press. Ensure absolute accuracy in the type and quantity of powder loaded.
- Seat and crimp the bullet into the shell using your press.
- Finally, Inspect your finished product.
Reloading safety
Here are some important rules for safe reloading. Remember, you could kill yourself or others if you are not careful. This is not an exhaustive list. You are responsible for taking all necessary precautions.
- Store powder in a cool, dry, safe location. Do not use the wrong kind of powder. Be especially careful not to confuse modern smokeless powder with black powder. Never smoke anywhere near powder. Discard any unlabelled or potentially mislabeled powder.
- Follow the recommendations you find in reloading manuals to the letter. Do not substitute with components, especially powder and projectiles, that have not been recommended. Start with the minimum recommended powder load. If unsure of the minimum load, start at load 15% lower than the maximum load. Inspect each shot for excess pressure before continuing to shoot. Do not exceed maximum or minimum loads.
- Check each case visually to avoid double powder loads. This is a common mistake and it can kill you.
- Any time you change a reloading component, pressure levels will change, so you will have to start developing your load from square one again. Even different lots of product from the same manufacturer can cause a significant difference.
- If a few hundred primers go off together, the impact will be equal to a hand grenade. Do not store them together in bulk. Discard unlabeled primers.
- Follow bullet seating and overall length recommendations carefully. They can have a huge impact on pressure levels.
- Keep your reloading area tidy, organized, and clean. Immediately clean up spilled powder or primers
- Read the instructions that came with your reloading equipment and contact the manufacturer with any questions.
- Only reload in a sober, alert, undistracted, and well-rested state of mind.
Conclusion
Reloading can be lots of fun as long as you respect the safety precautions necessary. It is a skill that every accomplished shooter should have. Check out our guides on some of the best reloading equipment that money can buy. Stay safe, do your research, hit the range as often as you can, and have fun!