Learning how to become a better long-range shooter?
Here’s the next instalment in the external ballistics theory mini-series: elevation.
External Ballistics: Elevation
When I talked about the vertical component of the trajectory, in Bullet Trajectory Part 1, I touched on the firing elevation angle.
I mentioned that when there is a firing elevation or depression angle, that is when you’re firing with the barrel inclined upward (uphill) or downward (downhill), the bullet always hits higher than the aimed point.
This happens when sights are zeroed on a level range, and then the shot is taken to a target positioned at the same distance but on a higher or lower ground, relative to the firing position, which forces the shooter to raise or lower the barrel to a degree.
Long-range precision shooters, such as hunters or military personnel, operating in mountainous or hilly terrain, or those operating in urban terrain, constantly deal with this phenomenon. The error induced by firing at an angle is considerable, and must always be taken into account, especially when extreme accuracy is needed and/or when shooting over long distances.
How much does elevation influence a shot?
To realize how much elevation influences a shot, I’ll give you an example: shooting with a .308 Win rifle zeroed at 100yds on a flat range, firing from an elevation angle of 15° (barely noticeable if not measured with a gauge) induces an error of 2.5in at 500yds, 7.5in at 800yds and 13.4in at 1000yds.
If you need extreme accuracy, that’s just enough margin of error to keep you off target. When the steepness of the elevation angle increases, the error dramatically increases, even at closer ranges. Shooting with the same rifle, zeroed at 100yds on a level range, with an elevation angle of 60°, you’ll shoot with an error of 5in just at 200yds (enough to keep you off the vital zone of a deer, for example) and 38in off at 500yds.
Longer shots with such an angle are unlikely, but consider this: shooting with this angle at 1000yds would yield an error of 200 inches, literally enough to miss the “broad side of a barn!”
Nest, I’ll show you the true reason for the point of impact shifting when managing elevation angles with long-range shooting.
Impact Shifting Explained
Above I introduced the concept of error derived from shooting at an angle and gave you a few practical examples. In this next section, we will examine the real reason for the point of impact shift.
In many texts around the web, you’ll find one common incorrect explanation of this phenomenon: a simplistic approach derived from the formula used to calculate compensation.
You may have read that your shot will land high because, when shooting at an angle, gravity has less effect on the bullet trajectory, since the horizontal distance traveled by the bullet it’s shorter. That’s not exactly the case.
Gravity and Bullet Drop
The amount of drop due to gravity is not a function of distance, but a function of time of flight, which remains constant because the linear distance to the target is the same. Actually, when shooting at an angle, there is a small change in drop due to gravity, which slows down a climbing bullet and accelerates a descending bullet, but its amount is negligible.

The accurate explanation for why the bullet flies high derives from a perspective fact. To fully comprehend this, you need to understand the difference between bullet drop and bullet path. As you read in the terms explanation articles, bullet drop is the distance from the line of departure to the bullet trajectory at a given distance. Drop is measured vertically (as with a plumb-bob), irrespective of the line of departure angle.
Bullet path on the other hand, effectively is where you would see the bullet along its trajectory, through your aligned sights. The distance that we can measure between the line of sight and bullet trajectory (so it can be positive or negative), but it’s always measured perpendicular to the line of sight.
This difference is the key of the concept, and you can see why analyzing the image below:
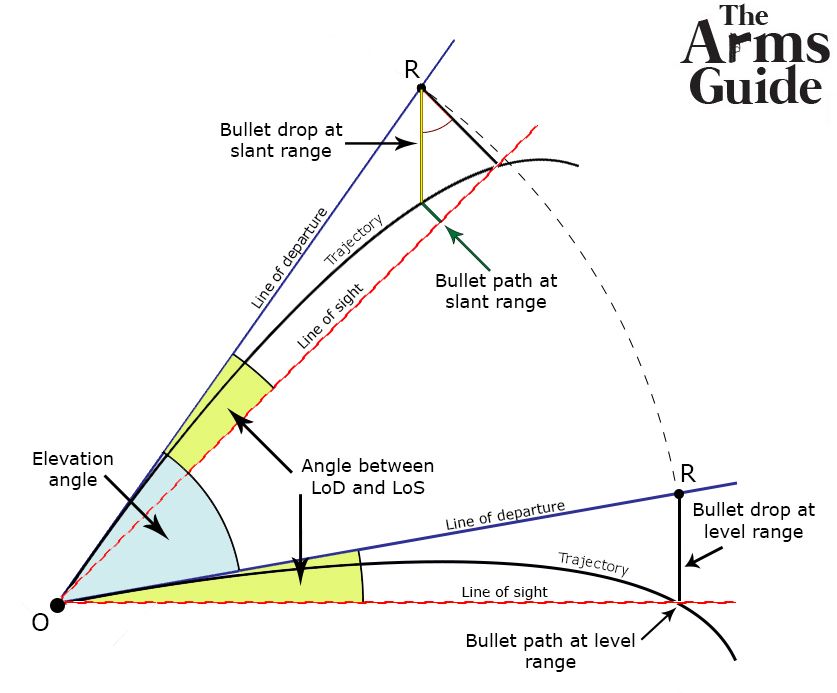
As you can see, when you zero for a distance (R) on a level range, you set the line of sight at a certain angle relative to the line of departure (in reality it is generally less than 1°, here it is exaggerated for clarity) to compensate for the bullet drop at that exact distance.
In this case, the bullet path at distance R is equal to 0 (zero) because the line of sight intersects the trajectory. In other words, the point of aim corresponds to the point of impact.
When raising the elevation angle by 45° to shoot a target above the firing position, you can see how the angle between line of sight and line of departure remains the same, because of sight regulation.
Trajectory also remains the same. What actually changes is bullet drop.
Since it is measured vertically, the distance measurement for R falls on the nearest point along the bullet trajectory.
That point is the point of the trajectory that you must now aim to be able to hit the target. As you can see, at that specific point, the trajectory is above the line of sight (that is zeroed to a point further along the trajectory) to a degree, which means that when aiming dead center, the shot hits high. Hence, you must adjust your sights to the amount of bullet path to be able to hit the target.
The same concept applies for depressed angles in the same way. There is only a subtle difference in trajectory between uphill and downhill shooting, due to the effect of drag acting respectively downward and upward, causing the bullet to drop more or less quickly. The difference in trajectory is slight—roughly 5in at 1000yds with an elevation or depression angle of 60°.
In the future “how to” section I will show you how to to gauge elevation/depression angle, and how to calculate compensation for it. But in my next article, I’ll focus on the effects of light and mirage, and how they affect point of aim and, consequentially, the point of impact.
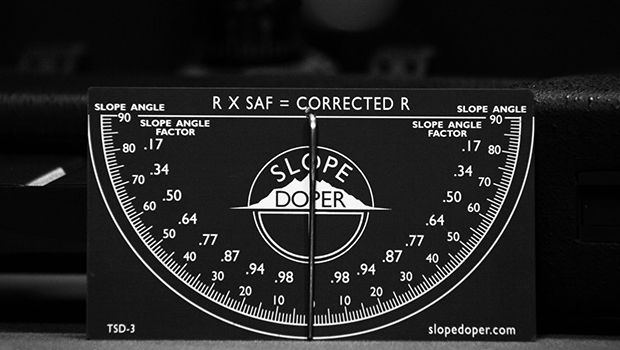
The featured image, an example of an elevation angle gauge, is courtesy of shootingUSA.com.
You might be interested in this article next: Best Scope For a Ruger 10/22